Birthday Block of the Month #4: Sheri Cifaldi-Morrill

Learning a new quilting skill can seem intimidating at first. But with a great teacher, you’ll feel supported and flourish! That’s where this month’s Quilt Alliance Birthday Block of the Month designer comes in. Sheri Cifaldi-Morrill, known for her growing and beloved pattern company Whole Circle Studio, is one of the most comprehensive and patient quilt teachers you can find — and that’s perfect for foundation paper piecing (FPP), which we’ll be doing this month!
We’ve focused on piecing fabric together for all of our previous months. This month, we’re adding paper as a foundation to create an astonishingly accurate quilt block. But if you’ve never done FPP before, you’re in the right place. Sheri has been a Quilt Alliance supporter for years and she’s here to teach you everything you need to know to succeed!

Meet Sheri
Sheri Cifaldi-Morrill of Whole Circle Studio is a designer who creates quilts that are both decorative and functional, blurring the divisions between art, design, and craft. After working in graphic design for over 20 years, she taught herself how to sew and discovered a passion for designing and making modern quilts. This exploration led her to pursue new opportunities and work with her hands to start her own studio business, specializing in the design of custom modern quilts, patterns, surface design illustration, and products.
You can follow her on Instagram, find her patterns on her website, and be sure to sign up for her excellent newsletter!
One of the Quilt Alliance’s signature projects is the Go Tell It video documentation project, which anyone can do. Watch the video below to see Sheri talk about her block, and keep reading this blog post to learn a tip for how to document your own quilts!
Sheri’s Top BOM Tips
Each month, our Birthday Block of the Month Designers will share their top tips for making the block they designed. Here are three great tips for making this block straight from Sheri herself.

Sheri’s Tip 1: Learn from the best!
If you’re an FPP beginner or need a refresher on the technique, Sheri has an extensive 40-minute free class for foundation paper piecing on her website. I’d recommend everyone who does this block watches the class! While she isn’t making the same block as our Quilt Alliance Birthday Block of the Month, you will learn valuable tips even if you’ve done FPP before.
The best thing about this video class is that you’re able to see each and every step of the FPP process on a fairly similar block to the one you’re making this month. Because you are basically sewing upside down with FPP, it can feel confusing at times. The process has never been more clear to me (Laura Hopper, BOM host) after viewing her video and seeing her walk through making 1 FPP template!
I’ve done my fair share of foundation paper piecing in the past, but I still decided to watch Sheri’s full video before making my test block. I learned so much and my block turned out better because of it! You’ll see this video referenced in this month’s PDF download as well because it is invaluable to the process of making this month’s block — or making any other FPP blocks in the future!
Sheri’s Tip 2: Shorter is Better
When foundation paper piecing, reduce your stitch length to 1.5. This shortened stitch length will make it easier to remove paper at the end. It also helps your seams stay strong while the paper is being pulled out.
Sheri’s Tip 3: Don’t Be Afraid of your Seam Ripper
Have your seam ripper handy and be prepared to use it! Even the most experienced paper piecers will need one at times — including me!
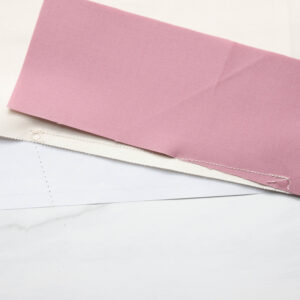
One of the things that can be hard to get used to with foundation paper piecing is making sure that your fabric doesn’t move once it’s under the paper you are using as a foundation. As you can see in the picture here, my fabric slipped as I was sewing the mauve fabric to the neutral fabric. Here’s a closer look:
Whoops! You can see that things started out well and part of the seam is on the mauve fabric. But as I sewed on, the fabric slipped off of the seam I was sewing. No problem — seam ripper to the rescue! I redid this seam and it looked perfect in the end.
Quilt Alliance BOM Tips
Each month, we share our best tips for making the Birthday Block of the Month as well, and this one is funny because our best tip is the same as Sheri’s first tip — make sure to watch her video tutorial on foundation paper piecing! But don’t worry, we have even more tips to help you along the way. Our tips this month are entirely about the neat tools that can help make foundation paper piecing easier!
Extra Tools Aren’t Required — But They Help!
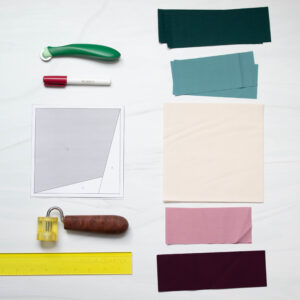 If you don’t want to invest in extra tools for this block because you don’t know if you’ll enjoy foundation paper piecing yet, that’s completely understandable! You can make foundation paper piecing work with tools you already have. However, it is a very specific technique that is made easier with the help of a few affordable notions. Here are some that I enjoy.
- Add-A-Quarter ruler: This ruler has a raised line along one long edge that measures exactly one quarter inch. It is designed to bump up again the edge of a folded piece of paper as you’re making a foundation paper piecing block. It allows you to know that you’re trimming your fabric to an accurate quarter inch.
- Seam roller: You can press your fabric as you’re working on your block, but if you’d rather not go back and forth to your iron so much, a seam roller will be your best friend. I use mine so much that I splurged on a very nice on from Modern American Vintage.
- Fabric glue pen: This is a helpful way to secure the first piece of fabric for a foundation paper pieced block to the paper, as Sheri demonstrates in her video. My personal favorite is made by Bohin.
- Tweezers: Removing paper at the end of creating an FPP block is so satisfying! What a wonderful way to celebrate being finished with a block. However, sometimes tiny bits of the paper can get stuck in the seams. Tweezers can help remove these papers — just be sure not to accidentally pull out any stitches.
- Tracing wheel: Pulling the paper out at the end of making a foundation paper pieced block can be challenging. Reducing your stitch length is the biggest help, but I also like going over all of the lines on the paper for an FPP block with a tracking wheel which makes little perforations in the paper. This not only makes it a little easier to rip the paper out, but it also makes it very easy to fold the paper while making the block! Note: This will leave little marks on your cutting mat, so use an old one or the back of yours. Check out what that looks like below!


And here’s the Add-A-Quarter ruler giving me that perfect quarter inch. You can see the ridge on the right hand side and how it lines up with the folded edge of the paper. Now all I have to do is trim the fabric to the right of the ruler!
Easy breezy! As we mentioned, it’s absolutely ok to skip the extra tools. Instead of an Add-A-Quarter, you can use a regular acrylic ruler. Instead of a new seam roller, try your iron out. Instead of a glue pen, try using a pin to hold fabric in place. And instead of a tracing wheel, try pre-folding the paper. That’s absolutely ok!
But these tools which may be new to you will take you far if you enjoy foundation paper piecing.

Quilt Documentation Tip
Have you ever tried a new technique? It can be a little scary at first — what if it doesn’t work or doesn’t make sense? What if it doesn’t look just like the designer’s picture? Ack!
One thing that might help you work through the anxieties of learning something new, while also documenting your process and personal quilting experiences, is to journal or write about your quilts. Check out the Quilt Alliance’s Textile Talk that focuses on writing about quilts! And don’t miss the announcement for our upcoming virtual Quilters Take a Moment event…there may be a workshop you’ll enjoy!
Video very helpful. Picked up a few tricks. Would have liked to have seen some tricks on removing the paper