
Birthday Block of the Month #5: Suzy Williams of Suzy Quilts

In the first four months of the Quilt Alliance’s Birthday Block of the Month celebration, we’ve had delightful quilt blocks that stretch our skills, and for month five we have something we haven’t seen before in this sew along — two classic quilt blocks coming together to create one new, almost three-dimensional shape!
Created using a nine patch and flying geese, this block by popular designer Suzy Williams of Suzy Quilts is so eye-catching, you may want to make it more than once! It’s why this block was used in the introduction PDF for the BOM as an example of making one of our blocks into an entire quilt. And it’s easier than it looks! Let’s dive into some tips and tricks that will help increase your accuracy to get the perfect 3D illusion in your block.

Meet Suzy
Suzy Williams is the founder of Suzy Quilts, a quilt pattern company and blog that is rooted in a deep love for the heritage and tradition of quilting and a desire to craft unique, contemporary textiles. Suzy uses her graphic design background to transform conventional sewing into a fresh, personal interpretation of minimal, modern design. Since its founding, Suzy Quilts has published over 60 quilt patterns and over 500 blog posts, growing an organic community of enthusiastic quilters along the way. Suzy is also a fabric designer with Art Gallery Fabrics.
You can follow her on Instagram, join the popular Suzy Quilts Patterns Facebook group, and find all of Suzy’s patterns plus blog posts filled with free tutorials and sewing tips on her website.
Suzy’s Top BOM Tips
Each month, our Birthday Block of the Month Designers will share their top tips for making the block they designed. Here are three great tips for making this block straight from Suzy herself.
Suzy’s Tip 1: Learn from the best!
If you’ve never made flying geese before, you may not know that there are multiple ways to create this simple block! In this month’s pattern, we use Suzy’s no-waste 4-at-a-time method. But you can visit her website and learn other ways to create the flying geese units (just be sure to adjust the cutting requirements accordingly).
Suzy’s Tip 2: Use a Great Ruler
Piecing accuracy isn’t just about your seam allowance. It’s also about cutting! Especially when trimming in the final step of creating the flying geese units, you want to be sure your ruler is a helper, not a hindrance. Check out this post from Suzy’s blog all about different types of quilting rulers to find one that’s right for you!
Suzy’s Tip 3: Good Pressing Increases Accuracy
Pressing may not be everyone’s favorite part of quilting, but without knowing and practicing great technique, your piecing accuracy can decrease. Accuracy is crucial to this block to create the 3D illusion, so be sure to read this post and watch the video tutorial about how to press seams in a quilt.
Quilt Alliance BOM Tips
Each month, we share our best tips for making the Birthday Block of the Month as well. These tips come to you from our Birthday Block of the Month host, Quilt Alliance co-president, and Suzy Quilts team member, Laura Hopper — that’s me! You can read my blog posts on the Suzy Quilts website here. And keep reading for the tips I came up with as I was making a sample block from Suzy’s design!
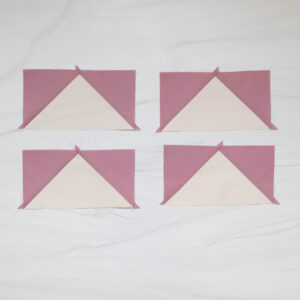
Know Where To Sew
Step 7 for creating the flying geese units may be the most confusing part of this block pattern. You know, the one that looks like the picture here.
But if you know where your seam should go, it’s much more clear! The picture above shows the two seams sewn on both sides of the guideline in Step 7. Do you notice how they both go to the open triangular spots between the pressed seam and the square you’re adding? Lining your seams up perfectly with those open points is the first tip for getting accurate flying geese.

Finger Pressing Improves Accuracy
We’ve gone over finger pressing before during this BOM, but I can’t say enough good things about it. It really works! Pressing seams with your iron right off the bat decreases accuracy because you have less control of how the seam is moving and you also have less visibility to check that the seam is falling exactly where you’d like.
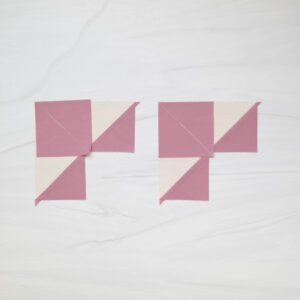
With a block like no-waste flying geese, you need every single fiber possible to ensure that you have accurate points. Controlling that seam is a huge help! To finger press, start with the block right side up. Gently use your fingers to fold over the seam as you plan to press it, then gently press down with your fingers until you’re happy with the result. Give the seam a quick press with your iron to set it, then turn it over and press as you normally would (I highly recommend using steam and a tailor’s clapper to set seams on the back). When making no-waste flying geese, I finger press ever single seam before pressing with an iron. The picture above shows how accurate the flying geese points can be with finger pressing! If your points look less accurate than this, try finger pressing the next unit.
Know Where to Aim When Sewing Flying Geese
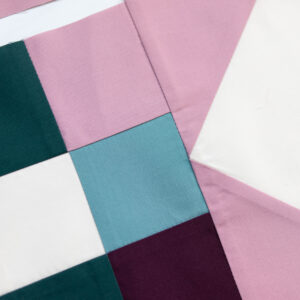
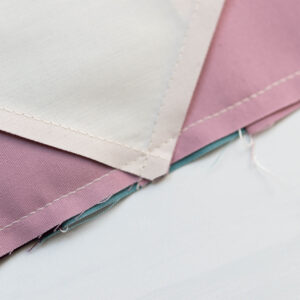 When it’s time to assemble the block, you’ll need to sew the flying geese to other units. Make sure to aim for the intersection shown above! Do you see how the seam is stitched through the X shape created by the flying geese? If your seam runs exactly through that X, your flying geese points will be perfect. Check out the results below!
Isn’t that a beautiful point? I just love sewing a seam and seeing this result. It’s so satisfying!
Quilt Documentation Tip
Every quilter has a story to tell. What was your first quilt? When did you decide that quilting was your hobby of choice? How has your quilting journey evolved over the years? Or if you’re a brand new quilter, what are your goals? Suzy did a QSOS oral history for the Quilt Alliance where she shares her story. Watch the video while you’re working on this quilt and reflect on your own quilting journey and how you can record it. Have you considered writing your quilting story in a journal and then using that journal to track the other quilts you make? What a wonderful gift for future generations to find!